Teaching Students Healthy Eating Habits

It's a new year and many of us resolve to change our lifestyle to improve our health whether that means losing weight, eating healthier or making sure we exercise. I try to bring those ideas to the classroom. I lost 160 lbs several years ago . For the next couple of weeks I will be sharing some tricks and tips I've done over the years to keep the weight off and have a healthier lifestyle. It isn't easy teaching culinary classes all day and being around food. Eating healthy and exercise doesn't have to be boring. It is a lifestyle commitment and I want students to know that!

Saturday, January 10, 2015

Soup's On! Spicy Sausage Tortellini Soup

This is a soup I posted on my other blog and is worth posting again.  I like it because it tastes good, easy to make and easy to change ingredients  to meet anyone's preferences.  As we start our soup unit at school, my goal is to show kids that soups can be easy to make and a great way to use ingredients you might have in your house AND it doesn't have to cost much.  Seasoning is important.
We will be looking at two main types of soup- broth-based and cream-based soup. For the next couple of weeks I will share soup recipes, my tricks for making them taste great and bread recipes I like to make that can go with them.  I am not a chef by any means and maybe some of what I share isn't exactly the way a professional chef would prepare them but over the years these tricks as well as recipes I will share have worked for me and my family  loves them.
This recipe starts out with tomato juice or what I like to use, V-8 juice.  It is a soup that gives me lots of opportunity to get people to enjoy vegetables. It also is versatile in that you can add other meat you might have on hand or even make it vegetarian-friendly.  Try it and I hope you enjoy!


Spicy Sausage Tortellini Soup

Ingredients
1 tablespoon olive oil
1/2 cup minced onions ( about 1/2 small onion)
1 tablespoon minced garlic
1 pkg diced kielbasa ( I like Hillshire Farms Polska Kielbasa)
1 large can V-8 juice (4 cups)
2 cups chicken broth
1 (14 ounce) crushed tomatoes (w/ liquid)
1 tablespoon Basil
1 (9 ounce) packages fresh tortellini
10 ounces fresh spinach
1/4 cup freshly grated parmesan cheese (optional)

Directions
In a pot, heat olive oil and sauté onion and garlic until onions are translucent, about 2-3 minutes. Add sausage and cook another 1-2 minutes.  Add V -8 juice, broth and tomatoes, turn heat up to high, and bring to a boil.  Add the tortellini and simmer another 15 minutes.

When tortellini is almost done, add spinach and taste, adjusting seasonings with salt and pepper.  Serve and garnish each serving with a sprinkling of parmasean.

Wednesday, December 31, 2014

Wow, 2015 is almost here!   I can't believe it!  I remember when I was a young girl thinking about how old I would be when we reached 2000.  Now that it is almost 2015 and I am 56 years old....how  time flies when you're having fun!  These past couple of weeks I've enjoyed trying new dishes and experimenting with different recipes in anticipation of the new year.  Next week's blog I plan to introduce some new soups and salads that taste good and can be healthy for you.  In the meantime, today's recipe is a  tasty one my daughter Jenny and I found and decided to try in anticipation of New Year's Eve.
Ok......I'll be honest.....nothing about it shouts healthy, BUT it does taste good and it is the last day of 2014....let's live on the dangerous side and enjoy...ok?
Jenny and I were looking at the internet and all of a sudden this bread oozing with cheese jumped out at us.
"YUM,  WE GOT TO TRY THIS!"


Stuffed Cheese Bread
I used a sourdough baguette because I love them!  Cut into bread at an angle almost all the way through but leave the bottom intact.
Notice that you can see the cubes!

Melt the butter and mix in your olive oil and all the herbs and seasonings and drizzle it between all the cubes

Next, place the grated cheese between the cut layers.  Stuff the cheese into each layer the best that you can!

Wrap bread in foil and place in 350 degree oven for 15-20 minutes until cheese is melted.

Unwrap and Enjoy!

Don't worry about the Calories....You can start counting them next year....2015!

STUFFED ITALIAN BREAD
recipe adapted from Monster Mama

Ingredients
1 Italian loaf, about 12 inches long
1 stick butter, melted
1/8 cup olive oil
3 tsp minced onion
2-3 cloves garlic, grated
1 tbsp dijon mustard
1 tbsp poppy seeds
3 tsp chopped parsley
12 oz grated cheese  (I used Colby jack and Pepperjack)

Directions
Preheat the oven to 350 F.  Mix the melted butter, olive oil, onion, garlic, dijon mustard, poppy seeds and parsley in a bowl.  Cut the bread into cubes with X slices without cutting all the way through the bottom crust. Pour the butter-onion garlic mixture carefully into those X cracks using a small spoon and over the top of the bread. Fill those delicious cracks with the grated cheese.Wrap the entire loaf with foil, sealing the sides properly and bake for 15-20 minutes. Remove from the oven and unwrap. Bake for another 10 minutes until the cheese is melted and gooey.

Wednesday, December 24, 2014

Great Last Minute Treats To Make!


Thanks To My Daughter Danielle For Introducing Me To This Recipe!

Salted Caramel Pretzel Bark
Ingredients
1/2 bag mini pretzels
1 cup butter
1 cup of brown sugar
3 cups 
chocolate chips
Coarse Sea salt

Directions
Preheat oven to 400 degrees.  Line a jelly roll pan with aluminum foil or parchment paper (NOT wax paper) and spread pretzels evenly over the bottom  Set aside.
 Melt butter and sugar in a medium sauce pan. As soon as they are melted,  pour mixture evenly over the pretzels.Place jelly roll sheet in oven for 7 minutes, remove, sprinkle chocolate chips over the top, and place back into the oven for 1 more minute.  Spread the chocolate around with a spatula until it is mostly melted, then sprinkle generously with sea salt.  Place in the freezer to harden.  


Moose Munch Made Simple

Ingredients
2 bags Microwave Caramel Corn
1 bag White Chocolate Chips
Variety of nuts and candy

Directions
Make microwave caramel corn according to package directions.  Spread both bags onto a greased baking sheet.  Sprinkle your favorite candy and nuts ( I like m&ms and honey-roasted peanuts!)

Meanwhile melt white chocolathe chips in microwave-proof bowl, checking and stirring every 15-20 seconds until melted.  Drizzle chocolate over the popcorn/candy/nut mixture and stir until mixed.  Also to set up and then break up and serve.

Monday, December 22, 2014


Peanut Butter Peanut Brittle

Peanut Butter Peanut Brittle

Ingredients
3 pounds
2 cups sugar
1/4 cup water
1 1/2 cups light corn syrup
2 cups salted peanuts
2 1/2-3 cups peanut butter
1/2 teaspoon vanilla
1 1/2 teaspoons baking soda

Ingredients
Butter a cookie sheet;place in warm oven to keep warm-to hot. Combine the baking soda and vanilla in a small cup and set aside.(this keeps the soda from brown flaking in your syrup). Combine sugar,water and corn syrup in heavy saucepan. Bring mixture to full boil over high heat, stirring until mixture appears clear. Cook to hard crack stage- 290 degrees.(No thermometer? Fill a cup with cold water and drip a drop of the syrup into water. Feel the drop at the bottom of the cup -- if it's hard and brittle, it's ready! Meanwhile, put the measured peanut butter and peanuts in a medium size bowl and microwave on defrost or half power to warm .
When the syrup hits 290 remove from heat and add vanilla,soda and the warmed peanut butter mixture. Combine and stir quickly. Working quickly, pour onto a very warm - hot buttered cookie sheet; spread with large spoons or forks. Cool; break into pieces.

Monday, December 15, 2014

Baking Some Christmas Cookies!

One of the best things about the holidays is the baking.  During the holiday season, there is nothing better than for me to spend the day baking.  I love to have classic Christmas songs playing, spending time with my dogs and trying new baking recipes.
That's how I relax... Really!
 This weekend I decided to try out some new recipes and revisit one I use every year.  I plan to share them with my students this week so maybe they can try them out during the holidays.
As I was looking at recipes, I thought about the cookie tray I wanted to prepare. It had to look good with different varieties as well as colors.  I looked and asked for recommendations (especially from my daughter who loves to bake, Danielle!). This week I want to share the recipes I made and what I liked about each of them!  Just click on the cookie and it will take you to the recipe. Enjoy!

1.  Italian Christmas Swirl Cookies


What attracted me to the Italian Swirl cookie was its color.  The cookie screams "Christmas".  Easy to make, it is a basic sugar-type cookie dough that is divided into two pieces, one is colored and then each piece is rolled into identical rectangle shapes. Refrigerated and then both pieces are stacked together and then rolled as if it was a cinnamon roll.  Jimmies are sprinkled on the counter and the cylinder-shaped cookie is rolled over them until they cover the entire cookie.  Quarter-inch  slices of the dough are cut and then baked.  We liked this cookie (we meaning both my husband Eric and me. This was his favorite tasting cookie!).  Not only did it taste good but looks great on a cookie tray!

2. Scottish Shortbread


I have tried all kinds of shortbread and have always been disappointed- either it doesn't taste very good or doesn't hold shape.  Finally I found THE best recipe.  The difference between all the other shortbread recipes and this one?  Brown sugar instead of white!

3. Salted Caramel Thumbprint


This cookie is amazing!  The chocolate cookie surrounded by pecans (or to reduce the price, crush up pretzels and roll them in instead!) and filled with caramel.  Delicious!


The Cranberry Bliss cookie was my favorite cookie.  I loved the sourness of the dried cranberries mixed with the sweetness of the white chocolate chips.  This cookie will melt in your mouth!

5.  Christmas Dream Drops


This meringue cookie is my go to cookie every year for cookie trays.  I discovered it one year as I read my Sunset magazine and noticed it had one first place in a cookie contest.  It's festive-like appearance enticed me to try it and ever since then I've been making it every year.  Its crisp outside with a soft, marshmallow-like center filled with white chocolate chips and crushed peppermint candies offer a flavor like no other cookie.

6.  Red Velvet Crinkles


What an easy cookie to make!  It uses a simple red velvet cake mix and a couple of other ingredients!  Just scoop it, roll it and dredge in powdered sugar and there you have a cookie that will remind you of Red Velvet cake!

There you go!  Try these six cookies and you will have a beautiful cookie tray that will imress  all of your friends.  Bon Appetit!


Sunday, December 7, 2014

Decorating Sugar Cookies!

Every Christmas I look forward to making cookies.  I enjoy making the old classics and trying out new recipes.  No matter what I make, I always love decorating sugar cookies.  The creativity and different  colors that can be used always excites me.  I look forward to trying out new sprinkles and checking out different shapes and sizes.  It's fun every year.This week I want to share my favorite rolled sugar cookie and royal icing recipe.
When cutting out shaped cookies, it is it is important to use a sugar recipe that is specifically made for cutting out cookies.  The recipe is formulated so that once the cookies are cut out and baked, they will spread very little as they are cooked.  Over the years I've tried many different recipes and either they lose shape as they bake or don't taste very good.  The recipe I'm going to share is Alton Brown's recipe for rolled sugar cookies.  The cookies keep their forms and taste good. Store the cookies in the freezer until you are ready to decorate!

Rolled Sugar Cookies
Courtesy of Alton Brown

Ingredients
3 cups all-purpose flour
3/4 teaspoon baking powder
1/4 teaspoon salt
1 cup unsalted butter, softened
1 cup sugar
1 egg, beaten
1 tablespoon milk
Powdered sugar, for rolling out dough

Directions

Sift together flour, baking powder, and salt. Set aside. Place butter and sugar in large bowl of electric stand mixer and beat until light in color. Add egg and milk and beat to combine. Put mixer on low speed, gradually add flour, and beat until mixture pulls away from the side of the bowl. Divide the dough in half, wrap in waxed paper, and refrigerate for 2 hours.  Preheat oven to 375 degrees F.  Sprinkle surface where you will roll out dough with powdered sugar. Remove 1 wrapped pack of dough from refrigerator at a time, sprinkle rolling pin with powdered sugar, and roll out dough to 1/4-inch thick. Move the dough around and check underneath frequently to make sure it is not sticking. If dough has warmed during rolling, place cold cookie sheet on top for 10 minutes to chill. Cut into desired shape, place at least 1-inch apart on greased baking sheet, parchment, or silicone baking mat, and bake for 7 to 9 minutes or until cookies are just beginning to turn brown around the edges, rotating cookie sheet halfway through baking time. Let sit on baking sheet for 2 minutes after removal from oven and then move to complete cooling on wire rack. Serve as is or ice as desired. Store in airtight container for up to 1 week.

Dough tastes great!  

Roll out on powdered sugar.  Extra flour can make the cookies tough!
This recipe holds it shape when baked!

Glossy Royal Icing
Allrecipes.com

Ingredients:
1/4 cup warm water
1 tablespoon light corn syrup
1/4 teaspoon almond extract
3 cups confectioners' sugar, or more as needed

Directions:
Stir warm water, corn syrup, and almond extract together in a small bowl until corn syrup and extract have dissolved. Place confectioners' sugar into a separate bowl and add liquid ingredients. Beat with an electric mixer on low speed until royal icing is smooth. Store in a lidded container for up to a week; stir thoroughly before using.

Create all your colors first and then decorate!

Do one color at a time.  Example, the brown parts on all the cookies.


Allow a couple of minutes to dry so your colors don't run together!

If you mess up?  Wipe it off quickly Or just color over it!

Different sprinkles are fun to use!

Don't be afraid to make mistakes!  Mistakes add character!

You don't have to go out to the very edges of the cook with icing.  Draw and outline and then fill it in!

Be creative!


Sunday, November 30, 2014

Creating a Gingerbread House

I get excited when this time of year rolls around because of the celebrations, remembering  traditions I grew up with  but most of all creating  memories with those around us.  I get excited over making Christmas cookies and candies.  I look forward to remembering that Christ's birth is the reason for the season.  I look for ways to bring joy and happiness to others.  To me it truly is the season for paying it forward and looking for ways to encourage others.
I
In my foods classes these next few weeks, we will be doing activities that hopefully will give  students some memorable experiences that they may be able to share with their own families and friends.  One of the big experiences that I introduce to my students is making Gingerbread houses.  In past years we have made them out of graham crackers, purchased kits and even made them from "scratch".  It is an activity that also enables kids to learn how to work as teams,develop problem-solving skills, be organized as well as develop their creativity. Wow, who knew learning could be so fun.
This year  my Culinary Arts students  made their own Gingerbread houses from scratch.  This week they will put "glue" them together with Royal Icing and decorate them.  The  theme is "Home Sweet Home".  They have to design a house that looks like what they live in now or hope to live in in the future.  They must work in teams AND everything other than the platform has to be edible.  Of course all houses are entered into our Gingerbread house contest and the first three houses  will receive prizes.  Each year I build my Gingerbread house so as to show them how to do it and the problems I have in constructing them.
Making The Dough 
The dough recipe I used included  the usual ingredients of molasses, ginger, cloves, nutmeg,shortening and flour.  It was easy to work with and when I would refrigerate it to use another day, all I needed to do was place it in microwave for 10-15 seconds which would warm it up just enough to make it pliable.

I rolled the dough out onto a parchment-lined baking sheet and then placed all my pattern pieces on the dough strategically so there would be very little wasted space.


I baked the gingerbread pieces in a 350 degree oven for approximately 25-35 minutes or until the pieces were firm in the middle (if you accidentally take them out and they're not quite firm just don't cover them so that they dry out and firm up.

Putting The House Together

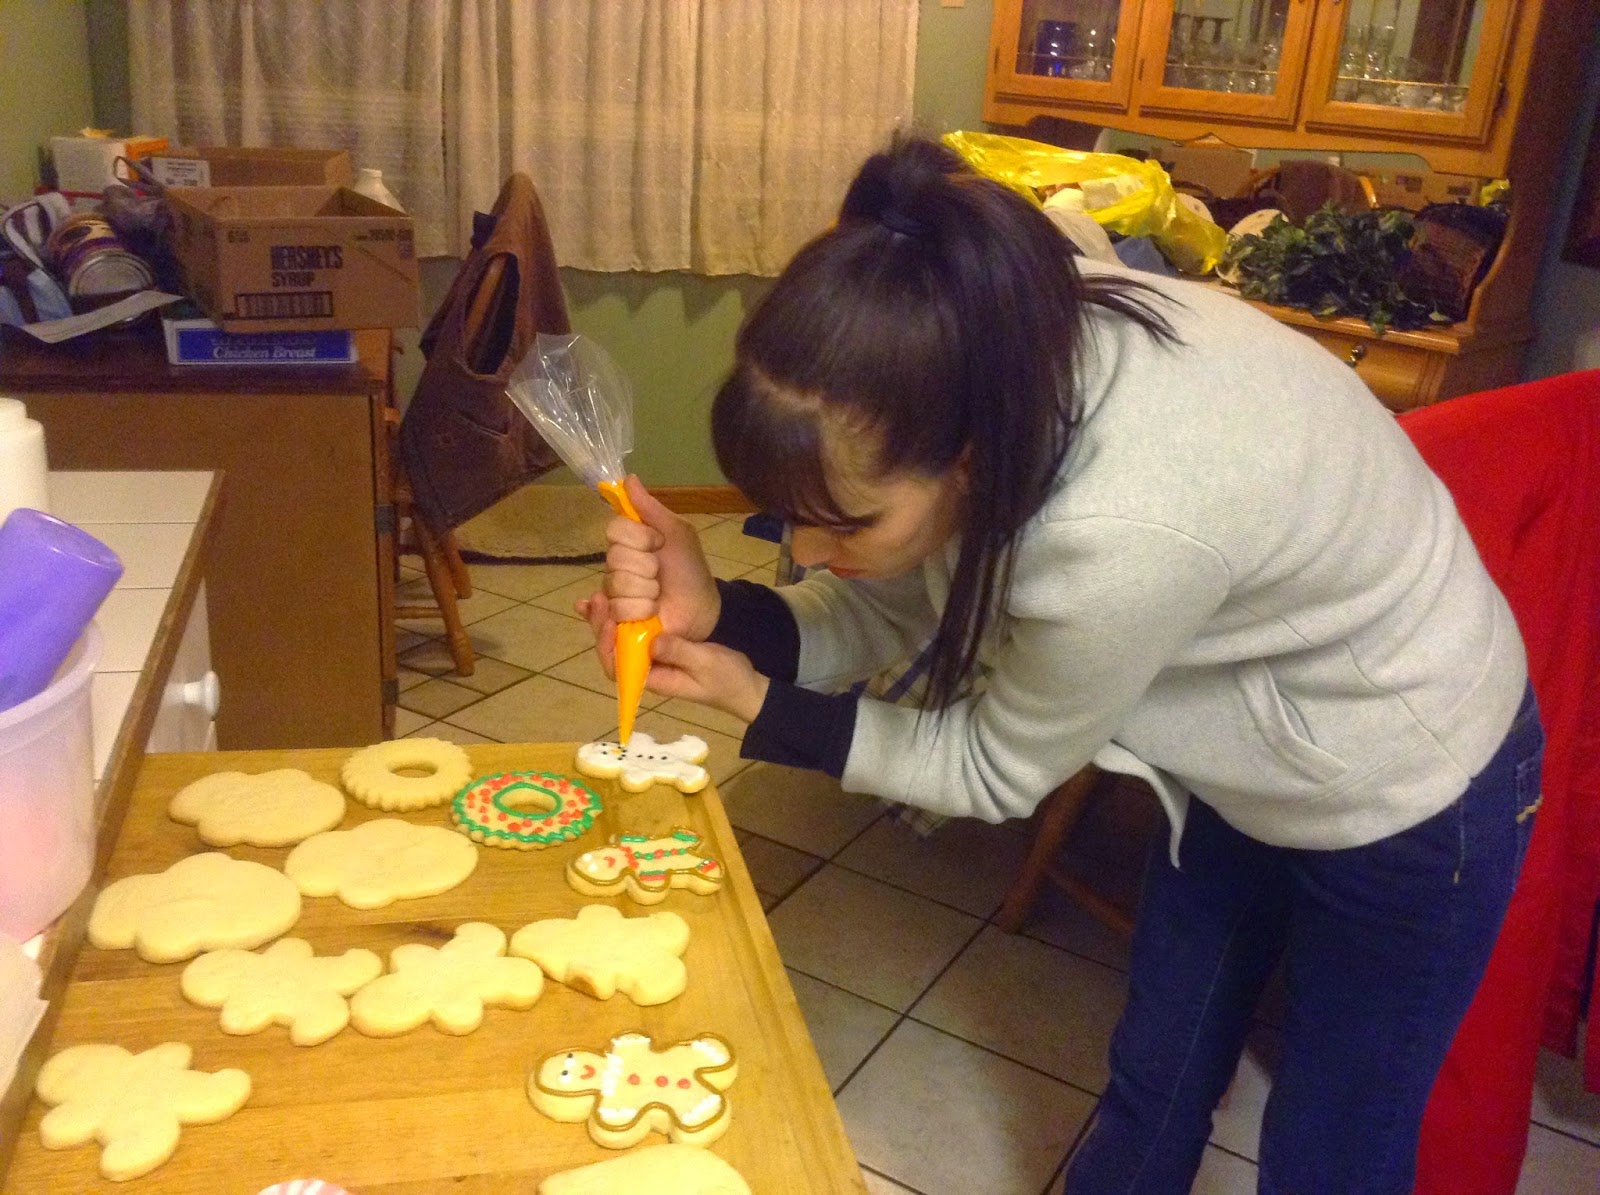
The "glue" is royal icing.  Here I have colored the icing so that it matches the gingerbread pieces but it isn't necessary if you decide to cover the house with a different color.  Make sure you put icing on both surfaces you plan to stick together.  It will help it adhere better.  Next give the walls some type of brace until they dry.  I used cans I had in the cupboard.


Its important you don't rush and begin decorating immediately, otherwise if it isn't totally dry, it will keep trying to collapse and you will have a big mess.


And now I am putting together my barn.


The symbols represent our brand.
Here I am in the process of creating a John Deere tractor.

The Final Project
After changing the house color three times, having to prop up a collapsing roof and not baking enough pieces for the barn, it is finally done.   


What I've Learned in The Process of Making a Gingerbread House.
  • Start with a simple design.  You can find many different plans on the internet.  It is better to start with a simple design and add to it through decoration.  
  • Take it slow.  Over the years I've watched students construct the houjustse and then try to decorate it before it was dry.  Suddenly the house collapses and student wants to give up.
  • If you mess up on the color, detail or just don't like something, scrap it off or take it off!  Sand it down, re do it and it will look as if you didn't have a problem in the first place!
  • Is it realistic to make everything edible?  Of course you can!  Tree trunks can be made from waffle cones.  Arms for the snowman? Uncooked spaghetti!  
Gingerbread House Dough
Courtesy of Food.com
Ingredients
2 cups corn syrup
1 1/2 cups firmly packed brown sugar
1 1/4 cups margarine
9 cups all-purpose flour
1/2 teaspoon salt

Directions
In a medium microwave-safe bowl, heat corn syrup, brown sugar and margarine until margarine has melted and sugar has dissolved completely. Stir until smooth.  Meanwhile, in a large bowl, combine flour and salt. Add syrup-sugar-margarine mixture. Mix well. Wrap the dough in plastic and let it rest at least 30 minutes at room temperature. Heat the oven to 350 degrees. Roll out the dough 1/4-inch thick onto a sheet of parchment cut to fit your baking pan. Lightly flour the cardboard patterns and place them on the rolled-out dough, leaving a 1-inch space between pieces. Try to fit as many as you can without crowding. Remove and reserve excess dough. Reroll dough scraps for the remainder of the pieces. Grab the opposite edges of the parchment paper and transfer to the baking sheet. Bake 12 to 15 minutes or until pieces are firm and lightly browned around the edges. Cool completely before removing from pans.

Royal Icing
Courtesy of Alton Brown

Ingredients
6 egg whites
1 teaspoon vanilla extract
4 cups confectioners' sugar

Directions
In large bowl of stand mixer combine the egg whites and vanilla and beat until frothy. Add confectioners' sugar gradually and mix on low speed until sugar is incorporated and mixture is shiny. Turn speed up to high and beat until mixture forms stiff, glossy peaks. This should take approximately 5 to 7 minutes. Add food coloring, if desired. For immediate use, transfer icing to pastry bag or heavy duty storage bag and pipe as desired. If using storage bag, clip corner. Store in airtight container in refrigerator for up to 3 days.

Enjoy!